Tools & Techniques for Fossil Preparation
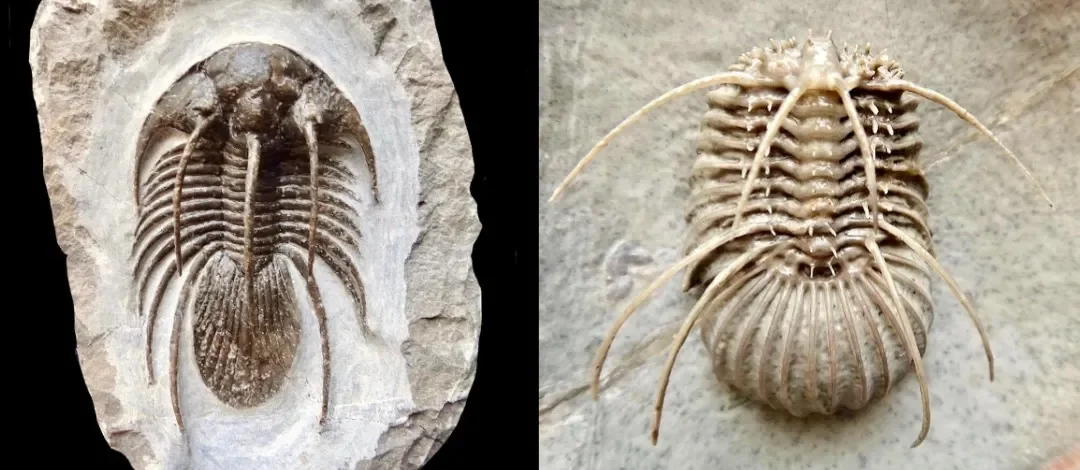
Side by side comparison of Devonian-age Moroccan Trilobites prepared using pneumatic tools. The left exhibits rough commercial preparation with many white dings while the right is a professionally prepared specimen with all the pleural spines kept intact. The small size of trilobites and their complex spiny morphology makes them especially difficult to prepare even using the best pneumatic tools. Credit: American Museum of Natural History Trilobite Archives: an incredible resource demonstrating the incredible biodiversity of trilobites with commentary from paleontologists
Fossil preparation is an enjoyable, yet time-consuming process suitable for those who enjoy working with their hands. This section aims to summarize the pros and cons of each type of fossil preparation equipment, along with purchase costs.
Safety: Professional fossil preparation is done in a ventilated lab setup with all the necessary safety equipment. No matter what type of tool is used, be sure to research the equipment necessary for protection against potential hazards.
Three main categories of fossil preparation tools:
Manual Tools: Includes pin-vices, dental tools, and hammer/chisels. Pin vices and dental tools utilize a wide variety of needles, ranging from stainless steel to tungsten carbide. Manual tools are suitable for the initial stages of fossil preparation to remove the bulk of the matrix from the fossil. Hammer and Chisels are suitable for splitting apart shale to reveal a positive and negative sides of the fossil. Budget: ~$10-$200
While manual tools are the least expensive option, they are insufficient when it comes to exposing fossils from especially hard, “sticky” matrix, and generally not recommended for removing matrix close to the fossil. “Sticky” matrix refers to rock that sticks to the fossil instead of chipping off the specimen after pressure is applied. If the rock fails to chip off after pressure is applied using manual tools, the tool often comes into direct contact with the fossil, leading to damage.
Rotary Tools: Includes Dremel products, engravers, and other tools that rely on a rotary motion to function. Through generating torque, these tools are able to expedite the process of removing rock by grinding it away into
a fine powder. These tools are especially versatile as they are compatible with a variety of tips ranging from diamond-encrusted needle-points to sanding drums. Usually, rotary tool kits come stocked with a good variety of tool accessories. Budget: ~$50–$300
Like manual tools, all rotary tools require the surface of the tool to come into direct contact with the fossil’s matrix. Rotary tools are suitable for removing the bulk of matrix fast and for preparing fossils that do not have much detail, such as bone material. Because these tools remove matrix through direct contact, they are similarly deficient when it comes to detailed work under a microscope or for removing “sticky” matrix. Before the operator can possibly stop it, a high-powered rotary bit is able to do irreparable damage to a specimen by accidentally grinding away the fossil itself after taking away the surrounding matrix. When working with rotary tools, it is highly recommended to use a ventilated setup and an NIOSH-approved P100 or N95 respirator mask to prevent silica inhalation from the rock dust produced by the tools.
Pneumatic Tools: Includes Air Scribes and Air Abrasives. As the most advanced and expensive tools for fossil preparation, pneumatic tools are the gold standard. Air scribes work as a type of high-powered chisel/jackhammer and are able to take away chunks of rock exponentially faster than the latter items mentioned, without coming into direct contact with the fossil. They can be equipped with different types of tips that are able to change the output of the scribe to best suit the purpose it is being used for. Air Abrasives, aka Air Erasers, can serve a similar purpose as Air Scribes but are typically used for finer preparation under a microscope. By using compressed air combined with a fine powder (Dolomite, Sodium Bicarbonate-Baking Soda, Iron powder), Air abrasives remove the surrounding rock but leave the fossil untouched.
Both types of equipment are simply part of a larger ecosystem necessary for using pneumatic tools; in order to use these tools, operators must invest in a setup that includes a stereo-microscope, ventilation hood, illuminated blast cabinet, and the highest grade dust masks available (FFP3, P100, N99). An entry-level setup with DIY components might cost upwards of $1,500, while a professional lab-grade setup used by museums and research institutions might cost upwards of $10,000.
Sources Cited:
“Fossil Preparation Laboratories.” American Museum of Natural History, American Museum of Natural History, https://www.amnh.org/research/paleontology/collections/fossil-preparation/history/laboratories.
“History of Fossil Preparation.” American Museum of Natural History, American Museum of Natural History, https://www.amnh.org/research/paleontology/collections/fossil-preparation/history.
“Laboratories.” American Museum of Natural History, American Museum of Natural History, https://www.amnh.org/research/paleontology/collections/fossil-preparation/history/laboratories.
“Revealing: Techniques.” American Museum of Natural History, American Museum of Natural History, https://www.amnh.org/research/paleontology/collections/fossil-preparation/revealing/techniques.
“Staff.” American Museum of Natural History, American Museum of Natural History, https://www.amnh.org/research/paleontology/collections/fossil-preparation/history/staff.
“Techniques.” American Museum of Natural History, American Museum of Natural History, https://www.amnh.org/research/paleontology/collections/fossil-preparation/history/techniques.
“Tools and Equipment.” American Museum of Natural History, American Museum of Natural History, https://www.amnh.org/research/paleontology/collections/fossil-preparation/revealing/tools-equipment.
